
When you first get into filmmaking, there’s a tendency to focus on the kit. Cameras, lenses, lights, mics, computers, software… Comparing specs, debating which thing is “better” and obsessing over the features and qualities your current kit doesn’t have (as if it’s going to make any difference to your work at this point)…
And this behaviour’s understandable because when you start out you don’t know about the technical stuff. You don’t know the difference between colour depth and bitrate, or what a T-stop is or what a French flag or a snoot or a promist filter is for. And you know that you don’t know so it’s a tangible thing. And rather than focus on the craft of filmmaking (which many people don’t even know is a thing!), most new filmmakers focus on kit instead because it’s easier to learn about specs and features and model numbers than it is to learn about how to create the shots and tell the story you want to tell. Plus, the latter only really comes from applying the techniques on a shoot so it’s often gated off behind experience anyway.
Craft is difficult. Gear is easy by comparison. Particularly when your knowledge of it boils down to playing Top Trumps with camera specs on the CVP website.
And hey, I’ll hold my hand up- I did a bit of this too. Watching NAB coverage and reading camera reviews and previews. Spouting features and model numbers like a walking brochure. But because I went to uni and studied video production, I had been trained in the craft of filmmaking by the time I was obsessing over kit. So when I was buying gear (mostly second-hand on eBay because the budget indie filmmaker market hadn’t exploded at this point), I was in a position to vaguely know what I was buying and how I’d use it on a shoot. I wasn’t just buying it because I thought it would magically make my work better, or because I didn’t feel pro without it or because I saw other filmmakers using it and thought I’d copy them. I was buying it because I knew how it could be used and how that would benefit my work.
Putting my old fart hat on for a moment, most new filmmakers today don’t have this experience because many of them are self-taught. They learn by watching videos on Youtube and frequenting message boards, and there’s nothing wrong with either of these sources… but when you learn exclusively from the internet it can be problematic. Most of the online content regarding filmmaking is about equipment- reviews, comparisons, tech specs and previews. And when the actual craft of filmmaking is discussed, it’s in a video essay or an ad-optimised bite-size “tutorial” by someone who, in all likelihood, has very limited skills and experience themselves.
Yeah, I’m a cynical bastard.
But don’t just learn from online sources is what I’m saying. Watch DVD BTS or listen to the commentaries- they usually discuss how the film was made and what they did to achieve the shots they got. Read filmmaking books- these don’t have a kit focus because by the time the book’s been published the specific gear stuff is largely out of date. They tend to talk in general terms about kit and instead concentrate on how to use it to create the effect you want.
But to help those thinking about dropping money on gear, I thought I’d share the three rules I (largely) follow when buying kit- which I’m now going to dub…
BRANT’S THREE COMMANDMENTS FOR BUYING SHIT
1 – Thou can only buy kit with money earned from video work.
This means I’m not spending money I don’t have on stuff or putting myself in debt unnecessarily. It also ensures I keep working. Additionally, you tend to be smarter with your purchases if it’s tangible money you’re spending rather than buying it on credit. Obviously, when you’re starting out, you won’t have this luxury, but it’s worth adopting it as soon as possible.
2 – Thou can only buy a particular piece of equipment if you’ve needed it on a shoot at least twice.
This ensures it’s a bit of kit I will actually need and use regularly enough to justify buying.
3 – Thou can only buy a particular piece of kit if it either solves a problem or it creates an opportunity.
This is the most important one. It ensures that what I’m buying will actually be useful to me, either by solving a problem I encounter on set or by adding enough potential value that it allows me to get more work or develop my abilities.
And to illustrate these three rules, I’m going to talk about a couple of bits of kit I’ve bought over the last year or so.
BLIND SPOT GEAR’S SCORPION LIGHTS
I can’t remember where I’d first seen these, but it was probably on one of the filmmaking news sites like NoFilmSchool. They started out as a Kickstarter but then went on general sale and it was when Blind Spot Gear dropped the price on them (to make way for the new improved v2 of the lights) that I picked mine up.
So what are they? The Scorpion light is a large, single daylight balanced LED chip under a lens, housed in a solid open face head with barn doors at the end of a flexible, posable gooseneck. If that didn’t paint a word picture for you, here’s an actual picture picture:
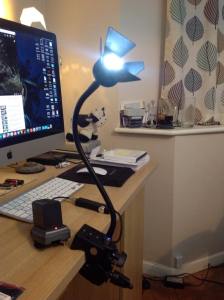
The light can then be slotted into a Manfrotto style superclamp so you can mount it anywhere. It’s dimmable and powered by Sony NPF style batteries (also included in the kit). I bought the imaginatively titled Scorpion Duo Kit, which includes two Scorpion lights, two clamps, two batteries, a battery charger and a set of Rosco gels, all in a toughened carry case.
They’re a novel design, for sure, but why did I buy them? Because they solved a problem.
Over the years I’ve had a few different types of lights, from cheap and cheerful open face redheads to 1st gen 1×1 LED panels- I’ve even lit scenes with B&Q worklights! But they all require floorspace. They need light stands and power cables and get in the way all the time, particularly if you’re shooting in real locations. You end up having to frame shots tighter so you don’t see the lights or the stands, there’s a potential death trap of cables even if you tape them down and it’s very hard to get a backlight into the shot because there’s no space. I would often find myself packing a full lighting kit and then leaving half of it in the car just so I didn’t have to deal with all this shit. And yes, the quality of my work would sometimes take a hit as a result.
The Scorpion lights solved this problem. They were small and I could clamp them anywhere so my shots could be wider. I didn’t have to use light stands and there were no cables all over the floor. I could get one behind the talent easily so I could backlight things again. And they were in a lightweight case so I didn’t mind carrying them from the car. As a bonus, they also had a better CRI than my old LED panels so I didn’t have to faff about with minus green gels and correcting shots in post.
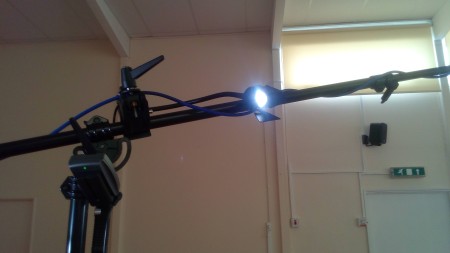
A Scorpion clamped to the soundie’s boom arm to give a hair light
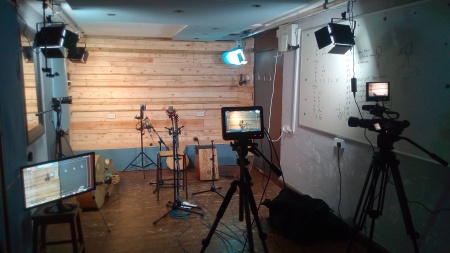
On a multicamera music livestream- two Scorpions are clamped to a light stand behind the talent
But they also created opportunities for me to light things in new ways. I could get lights into small spaces and use them as accents. I could get them above the talent or even hide them in shot. My lighting skills would improve because I’d be able to try things and get creative again.
So rule number three was satisfied and these were issues I had experienced on countless shoots before (even if I didn’t know what the solution was), so rule two was clear as well. Rule number one was the only sticking point. I hadn’t had much video work for a while so I didn’t have much more than about a fiver in the coffers- and the Scorpions were not exactly low-budget kit at over £500 for a two head set. So I put the Scorpion lights on my wish list, bookmarked the site and carried on. A few months and a job later, I checked the Blind Spot Gear website again and noticed they were having a sale and knocking a huge chunk off the price of the Scorpion lights down to £350. I could afford the Scorpion Duo kit. Just.
It took a few months for me to get my lights- I think Blind Spot had been taken by surprise at how successful their sale had been so there was a backlog- but within a month of getting them I had a fully paid corporate shoot and a series of music performance livestreams to use them on. And they worked a treat.
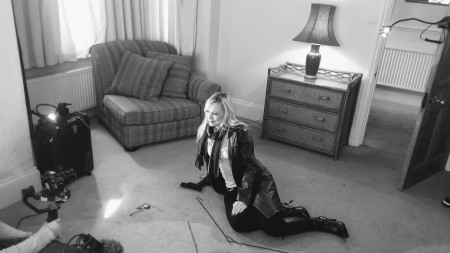
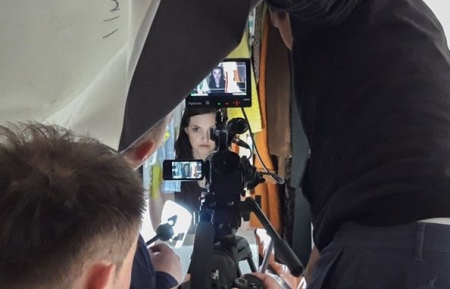
One Scorpion providing a hard film noir-style key light and another, clamped to a door, backlighting our actress
Clamped to one leg of the tripod to give a bit of fill for a fake through-the-back-of-the-wardrobe shot on “Instant”
To begin with, I just used them like any other lights, but over time I’ve become more experimental with them, using them to tweak the lighting in a scene or adding a coloured accent to a hair light. I’ve even mounted them to a gimbal to provide a bit of light for a steadicam shot.
Do they have any negatives? Yeah… The gooseneck isn’t quite as posable as I’d like since the weight of the light head can bring it down and they’re not as powerful as larger LED single chip lights (obviously), but what they do bring to the table is flexibility and the opportunity to do something interesting with them. They are now an essential part of my lighting kit and they come on every shoot with me, without fail.
The v1 Scorpion kit that I bought on deal for £350 (down from £550) isn’t available anymore from Blind Spot Gear, but if you dig around, you might find some old stock for sale somewhere. Alternatively, the tweaked and improved v2 models are out now and you can order them from CVP or Blind Spot Gear directly for about £575. I’d say if you have a bit of money to spare or plenty of work coming in, they’re worth investing in.
The no-budget alternative (and I use the term loosely) to a Scorpion might be this little number from IKEA. Gooseneck design- check. Clamp at one end- check. Decent output, colour rendition, barn doors, battery power and professional build- not so much. But for £10, it might be worth a look for the filmmaker with more moths than monies.
FALCONEYES RX18T ROLLFLEX LIGHT
I first saw this light on DSLRvideoshooter’s YouTube channel where Caleb Pike reviewed it alongside a similar low-budget flexlight. Up until this point, I didn’t know that something like this existed. I already owned three LED panel lights (two from the now-defunct CoolLights brand and one a no-name model bought from H Preston) and all of them were the typical, bulky metal and plastic housing with rows of bulb-style LEDs in them. And all of them were a pain in the arse for the reasons outlined above. But the idea of an LED panel made out of flat, chip-style LEDs sewn into a flexible canvas mat… that appealed to me.
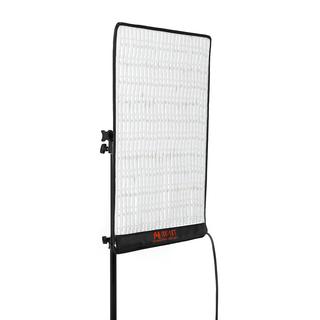
I should point out that unlike the Scorpion lights, the FalconEyes RollFlex LED mats are not a particularly unique design. There are loads on the market now, most of them from Chinese manufacturers, and the paradigm for this form factor are the Westcott FlexLights. They hold their form so you can shape them however you need, they’ve got very high output, great CRI and TLCI numbers and are very well designed. They are also quite expensive. Worth it for some people, but not so much for me.
But the FalconEyes models appealed to me and more importantly, appealed to my wallet. And again, they offered a solution to a problem and the opportunity to improve myself.
As well as all the problems I had with my existing LED panel lights (light stands, cables, bulky, pain in the arse…), the RollFlex also offered a solution to one of the possible issues with the Scorpion lights. I’d used the Scorpions on several shoots by this point and a couple of times, I’d had to compete with daylight coming in through large windows. The Scorpions are small fixtures and while their output is good, if I need a stronger, larger or softer light source, or just need to compete with bright skies, the Scorpions just won’t cut it. Normally, I’d use my old LED panels, but they aren’t super bright either, have less than stellar colour rendition and, as mentioned previously, come with a whole host of practical problems.
LED mats are thinner and lighter- I could gaffer tape them to walls if need be or mount them on a boom arm to get them into places I couldn’t put the other LED panels. Plus, they were newer designs with better CRI figures so they’d match better with the Scorpions. If I was going to replace my LED panels, a RollFlex might be the way to go.
So I watched a few reviews (I know, I’m a hypocrite!) but still had to read between the lines a little. Most reviewers are reviewing them from the point of view of a YouTuber- one whose content is pretty much PTCs and interview style stuff- so they were all using them on light stands in a very standard setup. Granted, most of my corporate work is like this so the perspective is fair, but I wanted to know what people were doing with them on less sit-down-and-rabbit-for-an-hour shoots. Could you gaffer tape one to the roof of a car to light the interior? Could you prop it up just out of shot in a tiny space? Could you roll it up and use it like a china ball? All these things seemed possible- and many reviewers thought so too- but I didn’t know if anyone had tried it.
But the possibilities appealed to me. And these were possibilities you wouldn’t have with normal panels. So I added them to the wish list again. I had some money coming in from a couple of corporate jobs so rule number one was also satisfied and I figured it’d certainly be more useful than my other panels.
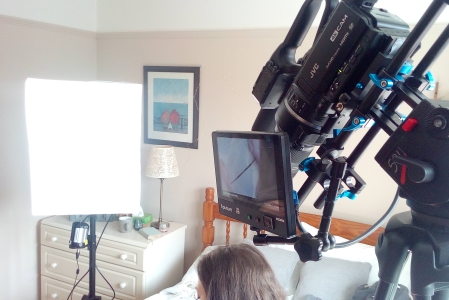
The RollFlex with shallow softbox mounted on a lightstand like a normal LED panel on the set of “Instant”
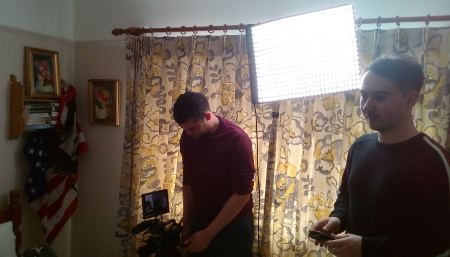
The bare light velcro’d to a curtain rail on “Instant”
The version I bought was the RX 18T. FalconEyes do several sizes for the lights (12, 18 and 24 inches) and daylight or bi-colour models (T and TD respectively). I went for the midsize daylight model since, like most lights in this price range, the bi-colour options use half the output for each colour and I’d thus lose one of my main reasons for getting it. The kit I bought also came with a thin, flat softbox and a domed softbox as well as a soft carrying case, which was a convenient touch.
So, what do I like about this light? Firstly, the output is a lot brighter than my old panels and the softbox more effective than the spun diffusion I would use on the others. It’s also really lightweight and while I’ve not yet gaffer taped it to something, I have suspended it on a boom arm to mimic a streetlight- something I couldn’t do with the other lights and probably couldn’t do all that easily with the Scorpions. I’ve also hung it from a curtain rail using velcro straps (the mat has velcro bits all over it). On the downside, it’s a bit of a faff to set up if you’re going to mount it on a light stand and there’s an inline control box, battery unit and AC adapter to plug in to each other. But it’s not complicated- just not as plug and play as a simple panel. Like most multi-bulb LED panels, it’s also not a hard light, so you won’t be sculpting film noir cheekbones with it (hence no barn doors attachment), but if you’re looking for a solid yet flexible soft light source, you could do a lot worse.
I bought my FalconEyes RollFlex light from Amazon for about £250, mainly because it was the easiest and cheapest place- even though it pains me to put more money in Bezos’ pockets. There are loads of alternatives on the market now though, mainly from Chinese kit manufacturers, and they’re probably all very similar. I went with the FalconEyes because it seemed to be both a recognised model and repeatedly reviewed well.
So what’s the takeaway with all this? Well, the point is, if you’re looking at buying some kit, don’t just do it because it gives you a gear-chubby. Be pragmatic. Learn your craft first. Make sure you have very good reasons for buying kit. And above all, know that the kit itself is by far and away the least important part of filmmaking.
DISCLAIMER – I should point out that I wasn’t paid, sponsored, coerced, teased or mason-handshook by either Blind Spot Gear or FalconEyes for these not-quite-reviews. I bought them with my own money and for the reasons outlined above. Like everything else on this blog, they’re my opinions and should be treated as such. Also, while I’ve linked to where you might get your own lights, they’re not affiliate links- not because I disagree with affiliates on principle, but because I’m a dumbass who can’t work out how to set them up.


